picture

picture

Saturday, 26 May 2012

done - just in time...

ok, I admit I didn't have all that much time left - but I finished the projects just in time, i.e. yesterday afternoon for today. I've been on night shifts before to finish something, so for me that was quite alright:)
and today at our May meeting we had lots of gorgeous projects to see, because it was agreed to hand in all our textile projects for the exhibition in september/october. the museum has to prepare the things and needs time to do so, and to be honest, I am rather glad to have this one out of my way! to make a long story short, here are my finished "Fuchsia cottage" socks:
the flat cardboard inlay isn't ideal for presentation, but my dummy feet aren't here yet, so they have to do. on the left there are two large yews (very common over here, no wonder, with the name Mayo = Maigh Eo in irish or plain of the yews). there are flowering shrubs in front, done with beads. the one on the right shows the fuchsia bush on the left, and a wall, path and gate to the right... both have a silk crochet fuchsia flower and a leaf dangling from the i-cord closure.

on the other side you see the round tower of Turlough and also a fuchsia bush - and on the right side the fuchsia cottage.... both feet are of course done in the famous 40 (or maybe not quite:) shades of green!

 a detail - the path to the right of the tower (purely fictional!) is covered in dandelion - the gardener must have been lazy:)
this is my favourite bit of the socks: the cottage garden. of course there are lots of flowers (done with beads) and even on the wall in front you can see a few weeds and flowers... I was briefly tempted to add some moss by needlefelting - but decided against it, there can be overkill in a design:)
I have to admit though that the front garden of our cottage doesn't look quite so charming:
but then it wasn't meant to show the real thing!


a contrast to the very fancy socks is the second pair, knitted from handspun jacobs wool, undyed. they stand for the countless simple socks the women of ireland (and I am sure in many other countries a century ago!) had to spin and knit for their large families. simple in design, but warm on the feet and much faster to make than the picture socks!
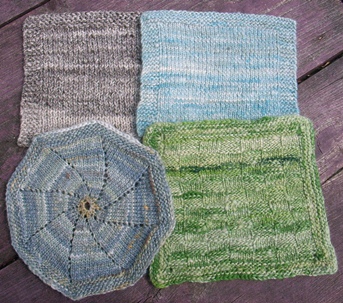
the museum also asked us to provide a few samples for the public to touch - to avoid ending up with grubby or even damaged projects we'll lay out some bits and pieces to feel.... I used three of the wool/silk blends of the fancy socks and one of the jacobs wool. after three squares I was bored and made a circle for the last one:)

this is the fuchsia flower hiding away in a bush - maybe it'll lure it's real cousins out soon? from afar it does look like the real deal - and I am looking forward to the first flowers, because I love the very exotic flower shape. they look like pagoda roofs to me, dainty and pretty and not at all as tough as the plant really is! I still have a bit of the silk left - and I think I'll crochet two more to make little earrings with....


this is what I have been doing during the last few weeks, i.e. apart from gardening etc. I also spun a skein of dark blue silk, finished three more skeins of cardinal red wool for a cardigan and made another pair of simple socks as a present... of course the next birthday is never far away - knitting needles, here I come (lace this time, I think it's a table runner in the making...)
but right now I am not keen - it's too warm for me to do any knitting. I spun some more silk in the museum today, but couldn't really find my rhythm and only managed a very small amount after all. first we have may temperatures lower than in winter - and now it's so warm that I'd like to spend my days in a bathtub full of water:) of course, those of you who have 30 deg. C most days - it's probably a nice fresh day - but for us here it's a veritable heat wave:)

Tuesday, 8 May 2012

the end is near

that sounds dramatic - but I only mean my sock project:) I finished the pair of simple socks knitted frrom handspun jacobs (why didn't I take a pic of them?). and I have just one picture sock and a bit of the foot of the other sock to do. plus of course the finishing, i-cords, fuchsia flowers and embroidery. I think I'll manage - but not with a lot of time to spare. note to myself: do try and start projects earlier.... will I ever listen to myself?:)
those are all the batts - finished to singles, not totally even, but nice and soft. I decided to use not the carded blend of blues and white, but the one I spun from pieces of top. all the rest (apart from the gold on top and the white) are lightly blended on the drum carder.

the sky, worked in rows, and a little bit of the roof - upside down! I didn't really like the long narrow stripes in the test sock, so I knitted clouds with short rows... typically irish: blue sky, but not without a few clouds, and even a bit of grey here and there....

 this is my hand drawn chart and the leg part of the sock - what a mess, lots of ends everywhere and threads dangling. I used quite a lot as longer pieces without a ball to feed from, because most of the colours, e.g. from the cottage parts, didn't use much at all. and it's so much easier to pull loose threads out of the mess than trying to disentangle several balls of wool! btw, if you want to make your own picture sock, you can download a grid here.
 this is the leg of the first sock finished... the knitting part at least. it still looks a bit bare, but I decided to add window frames, flowers etc. in embroidery. knitting them into the fabric would have meant even more threads, tangles and jittery nerves:) I thought for quite some time about the colour of the windows, but decided to choose "sky" colours - they reflect the good weather instead of being dark holes in the cottage wall. the upper edge still rolls of course, because the cast-on is done over a row of chain stitches - I'll add the i-cord edge last.
this is the "other side" of the sock, in the middle a path, walls in grey on either side and on the far left the fuchsia bush, which will carry the beady flowers when finished. I will also add an embroidered garden gate across the path. the foot will be all green, which makes for quicker knitting at least. I might still add a few embroidered stitches in yellow and white, for dandelion and daisies, but beads don't work so well on the foot, even if they are only small seed beads. it should still be a wearable sock and not a work of art - but unusable!

I hope I can finish this sock tonight and start with the second tomorrow - but depending on the weather I still have a lot of work to do in the garden!

looking at the last picture I saw just now that the sky looks a bit like sky, clouds along the horizon and the sea at the bottom! not intentional, but maybe it's a cottage close to the beach?:)

Saturday, 28 April 2012

nearly may!

it's nearly may - and the countdown is running to finish my "museum" socks! I've nearly all yarns spun and started knitting the first sock today - finally! it's a good thing I didn't plan for a sweater, because I doubt that I'd be able to finish that in time! I also put the test sock on hold, for once because the all green of the foot is boring to knit - and also because I'd run out of time with the "important" socks if I continued.. I still have the second "old-fashioned" sock in handspun jacobs to do for mindless knitting anyway.
 those are the blends I carded for stone walls, grass, path, sky and shrubs. plus a bit of purple to make the corolla of the fuchsia  and a few beads. I had planned to knit in tiny flowers, but there is just not enough space to do that in socks. the downside of faster knitting is not enough space to knit in special features. I'll add some beads instead.... I might also add a few other colours such as yellow and white in beads for flowers in the cottage garden, but I'll decide that on the hoof while doing the embroidery....
the fuchsia flower (crocheted) is in the middle; I spun some fine silk and plied it to make it more stable. it can't be too big, so I used a crochet hook in 1 mm.... the other yarns are all singles to avoid too much muddying of the colours. and even though I blended some blues/whites and greys for the sky - I decided not to use that finished yarn, because it was too well blended. in the end I just grabbed light blue, added white and very little grey for clouds and some darker blue for streaks of blue in the sky. I like it better now and to make the clouds in white stand out a bit I started to do short row parts (in the leg part of the sock) in garter stitch, so that there is a bit more "depth" in the sky part.... no pictures of that yet, because I could only show you about 10 rows:)

I also finished all the fibres I dyed with the leftover easter egg dyes.... all of them are plied with fine cotton, also remnants, which I dyed last year with procion mx dyes. I didn't have enough blue to ply the two skeins on the top left, so I finished half of the second skein with a dark pink... I like the greens best and the one on the right side, because the rosewood cotton worked so well with the rest of the colours. I've no idea yet what to do with the parrot colours bottom left,  so it all goes into the stash for now.

I also finally picked my wild garlic - and used it to make a load of pesto. given that I started out with only 3 little bubils about 15 years ago - I think it multiplied nicely under the leafy trees:) I managed to fill 6 kilner jars - and probably DH will finish it all by himself (actually, he already emptied 2 of the jars....). of course those jars will not last for more than maybe another month, but then I don't really like the idea of having everything available all year round! I think we appreciate certain foods more if we can't have them 24/7! I don't eat strawberries in winter or asparagus, so when the time comes I am really keen on them and indulge with more gusto! same for the wild garlic pesto. maybe I'll start freezing more of the wild garlic, once I have enough that it really is worth it. the pesto does not last a whole year, so I'll have to find another way to store it - provided the plants self-seed freely some more:) I also "help out" with propagation by collecting the ripe seeds (when they have turned black) and sowing them immediately. they need the cold in winter and germinate readily the next spring! I read somewhere that the green fruits can be used like capers, but if I try this I won't have any to spread out, so this has to wait, too....

I also finally updated my link list a bit and figured out why the page for recipes didn't show up! it helps if you click on "showing" instead of "hiding":) not that there's anything in it yet, but I do plan to put in bits and pieces during the next few months... if I can bring myself to write them down, I might even add a pattern page in time - but don't hold your breath:) still more to do - I have read more than just 3 books and there are more interesting textile books on my shelves, too....

Thursday, 19 April 2012

colourful results

I finally managed to dye all I need for the "real"picture socks. I already have some darker greens and a dark blue-green. but I needed something lighter as well. for this I tried a natural dye extract made from alfalfa, which I received from Ulrike. she has a lot of those extracts on offer here. it makes dyeing very easy; I just dissolved the powder in some warm water, added it to my dyepot full of water at about 50 deg. C, added the fibres and waited for about 30 min. the darker green on the upper right is the first batch, on the left you see where I used up the leftover. the bottom right went into the first bath as well, but before I turned it into green - it was yellow, like the ball on the left, which was dyed with tops of flowering gorse. I usually have more lemony results from that dye, but I think that was my own fault, because it was more lemon coloured after 1 hour in the dye pot. and turned a softer yellow over night in the pot! it gives the green a nice tinge, to add a bit more variety to the finished yarn.

I'll also need some blues for the sky part in my socks. I tried to use some instant indigo for that, but I think it had already oxidised (or I made a mistake while dyeing!). it only gave a very light blue, in the plait on the right. I didn't want to spend more time on setting up vats, so I used "indigo solution", which I still had in my stash. this resulted in the strong, slightly turquoise blue, which of course I have to blend to get anything remotely looking like sky:) - and the more green tone (also on the right). I also put a skein of sock wool into each dip. I had dyed them with ivy berries, but didn't like the results I had this time. I think they improved a lot in the blue dyebath! the purple/pink small ball is silk, which I dyed pink with cochenille last year. it also went into the blue pot. I spun some of the pink into a fine two-ply for the crocheted fuchsia flower, but I still needed the blue-purple tone for the corolla.
the two skeins in the middle are part of my easter egg leftovers. I toned down the rainbow a bit by plying it with a denim blue fine cotton thread. the green-yellow was plied with a light lilac - and the rest was done yesterday evening, but there was no proper light to take a photo of that. anyway, I used some more of the fine cotton, which I had dyed last year to use for the stacking toy. I have no idea what to use the skeins for, but they'll go into the stash for now - and we'll see.

of course it's gardening time, too - which means I have to plant some of the new stuff I bought! I planted 20 albion strawberries yesterday, but after that we had "showers on a string" - the other batch of symphony has to wait until it dries up again.
I also bought some new plants, 2 goji berries and 2 honeyberries (lonicera edulis):
I hope they'll like the climate, because the berries are supposed to be tasty and plentiful. and we bought a new kiwi, self-fertile according to the label! can that be trusted? it's always a problem when plants are dioecious - and apparently nurseries don't know about that (or don't care?). very often they offer the species, but only one of the sexes, which means that nothing much happens on the berry front. doesn't matter if it's juniper, seabuckthorn or kiwis - we've tried them all and always had to resort to specialist nurseries to get results. we'll see about the two newcomers so. but on the other hand my 4 blueberries in pots are doing great - full of flowers and the bees and bumble-bees are having a feast - at least if the humming and buzzing is anything to go by! most of the apple trees are bursting into flower as well - and I hope that the cold snap is going to end soon, so that the flowers produce nicely.... is there a more exciting time in the garden than spring? full of promise and something new to discover every day!


Tuesday, 10 April 2012

shenanigans for easter

Easter is already over again - I wonder what the shops will offer next? in germany mother's day is still to come, but over here that day has been and gone! no special holidays until .... halloween???
of course one of my usual jobs for easter is to produce coloured eggs. I sometimes use natural dyes, bind herbs on eggs into tights and dye them etc... but to be honest I don't really like cold boiled eggs, I prefer them fresh and warm! that's why this time I dyed them early on sunday morning. there wasn't enough time to pick fresh herbs, tie them in etc... so I just used some food dyes in small bottles, which are available in every supermarket over here. I don't really use them often, because I prefer my food in its natural colours, but they are quite practical for easter eggs. this is how I did it:
 I boiled some (a lot:) of eggs.....
 while they were boiling, I put 2 tbsp each of vinegar into tea mugs, added about 2 tbsp of dye, yellow, red, blue and green - and a mix of blue and red for purple. one spoon for each mug, to avoid messing about. I put the boiled eggs into the liquid, while still hot, left them for about 2 minutes each....


...and this is the result. the yellow is more orange, because I cannot buy white eggs here! and the brown shells do change the colours slightly - but I like it, because on white eggs the red would probably look like a traffic light:) the purple looked more like dark brown, but still nice.
and yes - the eggs were still warm for breakfast:)


and this is a batch of mordanted wool top from last week. if you think I put it here by mistake  - I didn't! I don't like to waste the colours, and because the eggs should be covered, there's always quite a lot of dye left. I mordanted this top with alum...
and painted the lot with the leftover dyes after breakfast on sunday. after a quick rinse (the dye is fast, nothing came out in the rinse) I managed to dry it over night.

and spun the first bit - the "sun" - during monday afternoon, while watching tv. now I just have to think about what to do next. use it as it is (thick and thin singles), ply it with something - or with itself? I don't think it'll be the latter, because I'd most likely end up with a parrot coloured barber pole! and navajo would result in a very chunky yarn, not really my first choice either. on the other hand, what to ply with? black? white? grey? not sure - for now I'll just finish the other colours:)

of course the most urgent next project is the sample sock for my "picture sock project". this is done mostly with commercially dyed sockwool. the "thatched" roof is naturally dyed (knitted tbl, to give a bit of texture). and the green on the left will be the fuchsia bush for my "fuchsia cottage" sock. I'll add the beads once the sock is done. I will also add flowers to the darker green area on the right and a garden gate in the middle. the provisional cast-on will be finished with an i-cord, and a fuchsia dangling from it.

I worked the leg part in rows instead of rounds, to work the intarsia a bit faster. not sure if I'll do the proper sock the same - or maybe with intarsia in the round. anyway the foot is done in rounds, because there's only a bit of a path knitted in intarsia, nothing too complicated. I would be nearly finished, if I hadn't done some frogging! at first I knitted the whole heel flap in "wall colours", but that would have meant that a large part of the foot would have to look like that - which I didn't want. nothing for it but to rip it out...to replace most of that colour by a blend of greens! I think most of the colours will be dyed similarly, but I might just add less grey to the sky! the odd thing about this sock is that darker blues came in the yarn, when I was nearly at the horizon! not the way the sky looks in nature at all:( I have to change that once I card the colour blend for the next sock!!

the second sock will have similar colours, but a different motive. close to the museum, where our group meets and the exhibition will take place, there's a famous round tower. this is it, the round tower of Turlough. it used to be a safe place monks retreated to if attacked! there was only one entry, quite high up in the wall. during an attack the monks were able to retreat into this tower, pull up the ladder - and defend themselves up there against intruders. the good thing for me is that it's quite a distinctive motive, but easily knitted into the sock. it's close to the lake beside the museum, so maybe I'll add a bit of lake and some greenery to the sock as well. I already sleep and dream socks - high time that I get that project off my to-do list!!

this morning I started dyeing by collecting gorse flowers for yellow. I tried out the easier method of just snipping off the tips into a bucket, instead of picking only the flowers by hand (which is quite painful and slow!) - and it worked just the same. fine - saves me a lot of work in the future:)
the yellow is fresh and lemony - but half of this will be overdyed with chlorophyll extract to give another green. when this is done I'll blend it with some greens I already dyed, with reed flowers etc. to spin the main colour of the sock from that. I also managed to dye the straw colour for the roof - though more by accident than design (the rhamnus berries in vinegar gave a straw colour instead of pinks or bluish tones:(). getting there... I hope!

Saturday, 7 April 2012

more hands, please!

I could do with a few spare ones.... so many ideas and not enough time to try them all out, it's a shame really. but some things have to be done in time - such as the easter bread, colourful eggs etc. no good in doing any of these things after tomorrow:)
anyway, there is something I've been meaning to show to you for a few weeks now. when I came home from my trip I found an unexpected envelope on my mail heap. it contained a book! ok, it's a book for children, but of course as a textile nut I like it as well, even though I don't have small children around. have a look:
 the book is written by Mairead Sharry, a fellow textil crafter, who lives in the southwest of ireland. she tells the story of Sive, a little girl, who lives in America. one day she plays with a kite - and suddenly the kite takes off and brings her over to the Aran Islands.

she visits her granny and some other family members and looks at all the things the islands have to offer. life is very different here - and Mairead does not only show this in her collage pictures; on the other page you'll find the story together with some real photographs about things special to the islands. as a spinner and knitter I love the "woolly" things most, of course:) and granny makes a nice pink sweater for Sive so that she has something to take home again, when Sive's dad picks her up some time later.
I like the handmade look of the collages in the book. it does not only tell the story of Sive, but also  of Mairead's love for her grandchildren - because this book is written for one of them. this is her second book like this (she also published a book "yarns", short stories about life on the Aran Islands); the first one was "Ronan - a children's guide to the Aran Islands" - and you can contact her on her blog if you'd like to get one (or both:) for yourself. the book would be suitable as a picture book, but of course you could also read the story to your little ones. they'll discover a lot to look at in the pictures and you can explain things like shearing sheep etc. as you go. they might even ask for a pink sweater:)
thanks, Mairead, for giving me this book. I've enjoyed it myself, but I also showed it to our textile group and everybody commented on how lovely the book turned out. I am sure your grandchildren will treasure them as something very special their granny made for them!

Monday, 19 March 2012

about the wristband

of course I didn't take step-by-step photos, because that idea always comes after I finished something.... but making the strap for the watch is really easy. I cast on a few stitches, worked the band straight in linen stitch and formed a tip by decreasing one stitch on each side, until only three were left (don't ask me how many stitches I cast on, I can't remember. not that many, maybe 9 or 11 or thereabouts? depends on desired width and yarn thickness anyway - and maybe the pattern you choose). I darned in the threads and started to work an attached i-cord over 3 stitches along the sides (start anywhere you like) the loop is formed by knitting a normal i-cord for some rows - until the strap is long enough to form the loop you'll need. then keep working the attached i-cord until you are back from where you started (you might want to fix the i-cord loop with a few stitches later, if needed to make it look neat). fix both "ends" together with kitchener - that's it. you can embroider, attach beads or embellish any way you fancy - or not at all. attach watch part and button/bead or any other closure - and enjoy wearing it! that's all there is to it - nothing fancy at all. if your loop part stretches or you made it too long in the first place - don't worry, just wind it around itself once or twice before pushing over the button.